Getting Started
rstore is a local-first data store for Vue and Nuxt applications. The core workflow is simple:
- Define collections for your app data.
- Connect those collections to your backend with hooks or plugins.
- Query and mutate data from components.
Choose your setup
- Use
@rstore/vuefor a standard Vue app where you create the store yourself. - Use
@rstore/nuxtfor Nuxt auto-registration, typeduseStore(), SSR integration, and DevTools support. - Use
@rstore/nuxt-drizzleif you already have a Drizzle schema and want rstore generated from it.
Vue
Use @rstore/vue when you want explicit control over store creation and plugin registration.
1. Install
npm i @rstore/vuepnpm i @rstore/vue2. Define a collection
This example keeps everything self-contained by putting the backend integration directly in the collection hooks.
import type { StoreSchema } from '@rstore/vue'
import { withItemType } from '@rstore/vue'

export interface Todo {
  id: string
  title: string
  completed: boolean
}

const todos = withItemType<Todo>().defineCollection({
  name: 'todos',
  hooks: {
    fetchFirst: ({ key }) => fetch(`/api/todos/${key}`).then(r => r.json()),
    fetchMany: () => fetch('/api/todos').then(r => r.json()),
    create: ({ item }) => fetch('/api/todos', {
      method: 'POST',
      headers: { 'Content-Type': 'application/json' },
      body: JSON.stringify(item),
    }).then(r => r.json()),
    update: ({ key, item }) => fetch(`/api/todos/${key}`, {
      method: 'PATCH',
      headers: { 'Content-Type': 'application/json' },
      body: JSON.stringify(item),
    }).then(r => r.json()),
    delete: ({ key }) => fetch(`/api/todos/${key}`, {
      method: 'DELETE',
    }),
  },
})

export const schema = [
  todos,
] satisfies StoreSchema
TIP
If several collections share the same transport logic, move that logic into a plugin instead of repeating hooks per collection.
3. Create and install the store
import type { VueStore } from '@rstore/vue'
import type { App } from 'vue'
import { createStore, RstorePlugin } from '@rstore/vue'
import { schema } from './schema'

export async function setupRstore(app: App) {
  const store = await createStore({
    schema,
  })

  app.use(RstorePlugin, { store })
}

declare module '@rstore/vue' {
  export function useStore(): VueStore<typeof schema>
}import { createApp } from 'vue'
import App from './App.vue'
import { setupRstore } from './rstore'
async function main() {
const app = createApp(App)
await setupRstore(app)
app.mount('#app')
}
main()4. Query and mutate in a component
<script setup lang="ts">
import { useStore } from '@rstore/vue'

const store = useStore()

const { data: todos, loading } = await store.todos.query(q => q.many())

async function addTodo() {
  await store.todos.create({
    id: crypto.randomUUID(),
    title: 'Ship the docs',
    completed: false,
  })
}
</script>

<template>
  <button @click="addTodo()">
    Add todo
  </button>

  <div v-if="loading">
    Loading...
  </div>

  <ul v-else>
    <li v-for="todo in todos" :key="todo.id">
      {{ todo.title }}
    </li>
  </ul>
</template>
Successful mutations update the normalized cache, so all reactive readers stay in sync automatically.
5. Next steps
- Learn the collection model in Schema > Collection
- Move repeated backend logic into Plugins
- Use Queries, Mutations, and Forms
Nuxt
Use @rstore/nuxt when you want Nuxt-native setup with filesystem conventions.
The Nuxt module will automatically:
- scan
app/rstorefor collection exports - scan
app/rstore/pluginsfor plugin exports - create the store
- handle SSR payload integration
- expose a typed
useStore()composable - auto-import schema helpers such as
RStoreSchemaanddefineRstorePlugin
1. Install the module
npm i @rstore/nuxtpnpm i @rstore/nuxtexport default defineNuxtConfig({
modules: ['@rstore/nuxt'],
})2. Add collections in app/rstore
interface Todo {
  id: string
  title: string
  completed: boolean
}

export default RStoreSchema.withItemType<Todo>().defineCollection({
  name: 'todos',
  hooks: {
    fetchFirst: ({ key }) => $fetch(`/api/todos/${key}`),
    fetchMany: () => $fetch('/api/todos'),
    create: ({ item }) => $fetch('/api/todos', {
      method: 'POST',
      body: item,
    }),
    update: ({ key, item }) => $fetch(`/api/todos/${key}`, {
      method: 'PATCH',
      body: item,
    }),
    delete: ({ key }) => $fetch(`/api/todos/${key}`, {
      method: 'DELETE',
    }),
  },
})
INFO
If you prefer centralizing transport logic, add plugins in app/rstore/plugins and keep collections focused on data shape.
File scanning
The Nuxt module scans files directly inside app/rstore. If you split collections into nested folders, re-export them from a top-level file or use Nuxt layers.
3. Use the store in pages and components
<script setup lang="ts">
const store = useStore()
const { data: todos } = await store.todos.query(q => q.many())
async function toggle(todo) {
await todo.$update({
completed: !todo.completed,
})
}
</script>
<template>
<ul>
<li v-for="todo in todos" :key="todo.id">
<button @click="toggle(todo)">
{{ todo.completed ? 'Undo' : 'Complete' }}
</button>
{{ todo.title }}
</li>
</ul>
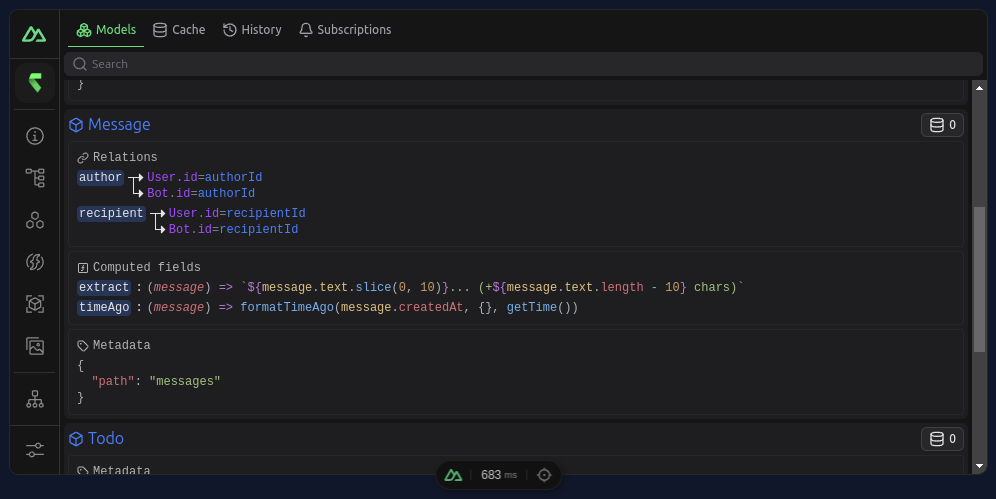
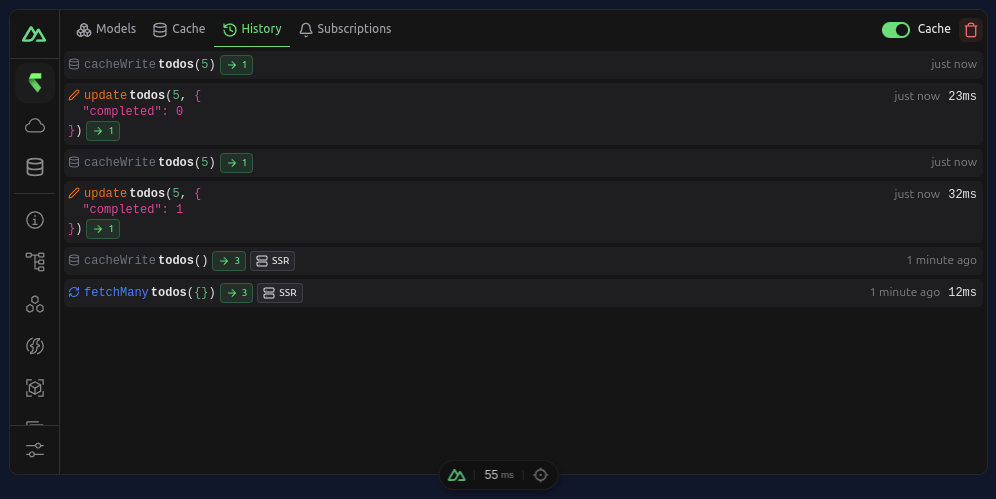
</template>Open Nuxt DevTools and inspect the rstore tab to see collections, cache state, and history:
4. Next steps
- Embed the Devtools UI in your app with Devtools
- Learn Nuxt-specific helpers in Plugins
- Explore live subscriptions and offline support
- Read about federation if you have multiple data sources
Nuxt + Drizzle
If you already use Drizzle, @rstore/nuxt-drizzle is the fastest path. It generates rstore collections and the matching server API from your Drizzle schema.
INFO
This setup expects a working Drizzle schema and drizzle.config.ts first. If Drizzle is not set up yet, do that before enabling the module.
1. Install the module
npm i @rstore/nuxt-drizzlepnpm i @rstore/nuxt-drizzleexport default defineNuxtConfig({
modules: ['@rstore/nuxt-drizzle'],
})2. Expose your Drizzle instance
import { drizzle } from 'drizzle-orm/libsql'
import * as schema from '../database/schema'

let drizzleInstance: ReturnType<typeof drizzle> | null = null

export function useDrizzle() {
  drizzleInstance ??= drizzle({
    schema,
    connection: { url: useRuntimeConfig().dbUrl },
  })

  return drizzleInstance
}
3. Start querying
Once the module is configured, you can query generated collections directly in your app:
<script setup lang="ts">
const store = useStore()
const { data: posts } = await store.posts.query(q => q.many())
</script>
The module automatically wires:
- generated collections from your Drizzle schema
- a server API under
/api/rstore - a client plugin for queries and mutations
- type generation for store usage